
 by
by
Though it has been very boring and time consuming for me in the beginning, yet it ended quite fruitful to me in the end :)
Without further delay, one of the most common and basic task when implementing an enterprise system is to import the legacy system setup data into the new system. The objective of this post is to share all the basic tools and scenarios you will need to import / export data.
This post will specifically provide guidance on importing records from external sources like excel file into Microsoft Dynamics AX 2012. But first of all, lets see how much variety has Microsoft provided in the regards of data import export and migration between the AX and other system;
http://technet.microsoft.com/en-us/library/aa548629.aspx : A worthy resource to begin with. Read the small article and get a good basic idea of all the tools provided by Microsoft and their purposes.
Secondly lets get hands on importing a few records in some setup table of AX, say MainAccount (chart of accounts table). By the way you can import data into any AX table
Quoting from the above mentioned post:
Now since this is quite a handy and straight forward tool powerful enough to handle around 10000 records, it would be the pick for us for basic setup data import. Hence we will use excel add in for setup data imports.Without further delay, one of the most common and basic task when implementing an enterprise system is to import the legacy system setup data into the new system. The objective of this post is to share all the basic tools and scenarios you will need to import / export data.
This post will specifically provide guidance on importing records from external sources like excel file into Microsoft Dynamics AX 2012. But first of all, lets see how much variety has Microsoft provided in the regards of data import export and migration between the AX and other system;
http://technet.microsoft.com/en-us/library/aa548629.aspx : A worthy resource to begin with. Read the small article and get a good basic idea of all the tools provided by Microsoft and their purposes.
Secondly lets get hands on importing a few records in some setup table of AX, say MainAccount (chart of accounts table). By the way you can import data into any AX table
Quoting from the above mentioned post:
Microsoft Excel Add-in: Excel import is a tool that can be used for data in an Excel format, or in a comma-separated list. You can use built-in or custom templates to help users import data. Use this tool in the following situations:
- Minimal data cleansing by end users is required.
- You are handling low to medium data volumes (< 10,000 records).
- You are working with simple data structures that can easily be flattened.
- No business logic is required outside an existing document service.
Installation
For installation and configuration with AX, see these posts:
http://msdax.wordpress.com/2011/05/14/office-addins-dynamics-ax-2012/
Usage:
The usage as far as import is concerned is fantastically straight forward. And if the tool is rightly configured (i was lucky to got it configured already at my place :) ), its as easy as PIE literally. All you have to do is to follow the following straight points:
- Create a new document.
- Go to Dynamics AX tab
- Scroll click the Action Pane > Design > Add Data command menu button

- Click Add tables menu item

- Select the desired table (all tables are provided, in our example we will select the MainAccount table)
- This will enhance the excel UI with a Field chooser left bar (showing all the fields) and a few mandatory fields (typically the PK and FKs) dropped over the worksheet.
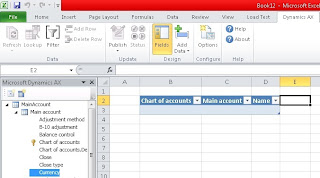
- Select at least all the mandatory fields required to save a valid record in the selected table. In our example, we will drop the following fields;
- Chart of accounts
- Main account
- Name
- Main account type
- Reference ID

- To load data from the table: Close the field bar (which should enable the publish button) and hit Action Pane > Update > Publish
- Start creating records by simple typing and tabbing to next fields and to next records.

- To save your work back in AX, hit the publish button and you are done
- Publish button disabled: Close the field bar on the left. You should close this bar as soon as you are done with choosing the fields. Closing the field bar may result in wiping all the newly created records. Make sure you close it as soon as you are done adding the fields


Enjoy importing data into Dynamics AX like APIE :)
1 comments:
Thanks. You helped me.
Post a Comment